Introduction
Cloud technology has undoubtedly become a major part of modern enterprise architecture, empowering organizations to streamline processes, enhance collaboration, and drive innovation. Due to this, the reliance on Linux-based systems has become much more prevalent, powering critical servers, containers, and virtual machines across the globe.
Many security companies, blogs, channels, and researchers I follow still largely post Windows-based content. While the majority of Linux malware may not exhibit the same level of complexity as some of its Windows counterparts (consider coin miners as an example); the threat landscape is rapidly evolving. Notably, threat actors are increasingly leveraging cross-platform languages such as Go and Rust to develop sophisticated malware that can target both Linux and Windows environments seamlessly.
The emergence of cross-platform languages introduces a new layer of challenge for the cybersecurity community. Malware crafted in languages like Go and Rust tends to be more elusive, as these languages provide a level of flexibility and efficiency that allows threat actors to create resilient and adaptable code. Unfortunately, this evolving trend remains largely undocumented in comparison to the wealth of information available for Windows-based threats. Understanding the nuances of Linux-based threats may be entirely new to some, and don’t get me wrong I have seen some really detailed blog posts that outline the analysis Linux malware, yet I feel there is still a gap in available knowledge sharing on how to analyse Linux malware.
This post will be the beginning of a series (said it so I need to commit now!) where I’ll explore concepts, share valuable insights, and provide practical methodologies and tool recommendations for conducting Linux malware analysis.
Building a Linux Malware Lab
To get started, let’s explore the setup of a suitable environment for conducting analysis, whether it’s static or dynamic.
Requirements
The following host machine requirements are only suggested but should be considered a minimum:
- Laptop / PC with at least 8GB of RAM
- At least 40GB of storage
- An Internet connection
- Hypervisor
- VirtualBox
- VMWare Workstation Pro (free version has limitations for analysis)
- VPN (some method to mask your IP if not using a cloud host)
For the purposes of this guide, I will be using VirtualBox 1 since it is free and has all the functionality required.
Guest OS
Of course, you will need an OS to load into your Virtual Environment for actually conducting analysis. This guide will utilise the following:
I’ve opted for REMnux as it is easy to install and setup, plus it is designed with Reverse Engineering Malware in mind (REM - it’s in the name!). Additionally, I’ve added pfSense for a Firewall which will allow for additional network segregation from the host machine (if you require analysis with a live internet connection).
Environment Setup
This section covers basic setup of the required guest VM’s and provides links to relevant setup resources as required.
REMnux
Let’s start by getting the REMnux VM up and running ‘out of the box’. Head here and download the VirtualBox OVA file and confirm the hash is as it should be.
Open VirtualBox Manager then click: File > Import Appliance to bring up a dialog where you can select the downloaded OVA to import. Click next and you should see a screen like so:
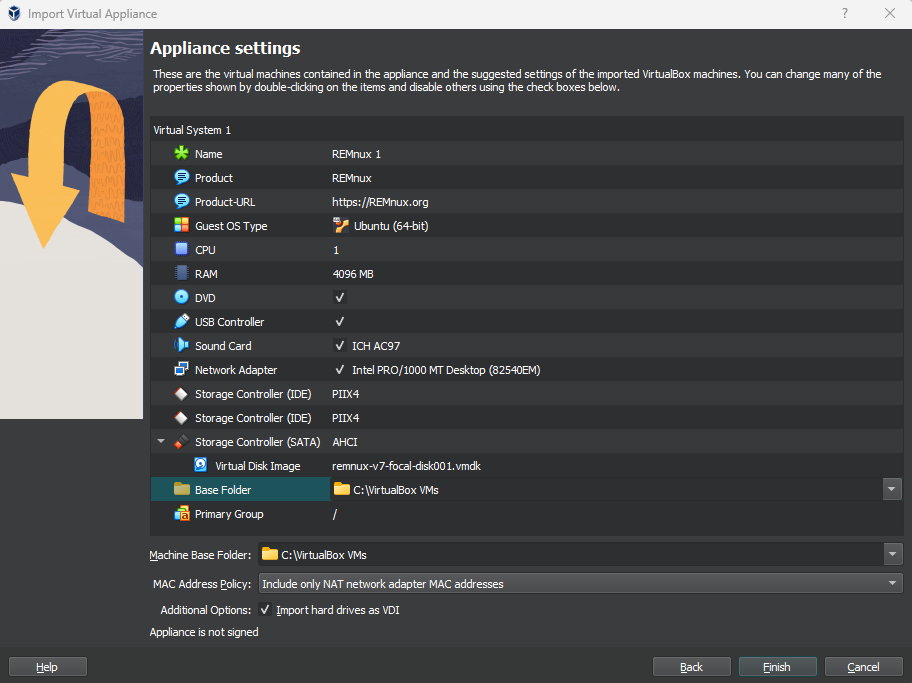
If you have the capacity here to do so, I suggest doubling the RAM and adding an extra CPU purely for performance. Click Import to finish and the machine will import ready to be used.
Prior to your first run, it is worth checking out the Settings for your guest in the VirtualBox Manager. Some considerations may include:
- Check Shared Clipboard and “Drag’n’Drop” settings
- Bidirectional if you want it
- Shared Folders
- Add any you want here (depends how samples will be added to the VM)
- Network
- Keep as NAT for now
Next, go ahead and fire up the VM for some general housekeeping.
Update and upgrade REMnux tooling:
remnux upgrade
remnux update
Why not add a Tools directory to store any additional tooling you want to add/update.
mkdir Tools
Check Settings > Language and Region to ensure you have the keyboard mapped how you like.
Now isn’t a bad time to take a Snapshot to store the state of the guest VM.
At this stage the REMnux VM could be used to start analysing malware. However, this guide will provide some additional steps for you to consider.
pfSense
The addition of a firewall in this guide is to provide an added layer of protection to your host machine. Using NAT or bridged mode can expose the host system to potential security risks (and possible AV triggering). Therefore, this guide will utilise an internal/host-based virtual network to provide communication between analysis machine(s) and the outside world if desired.
To get started head here to download the latest stable release (Community Edition). Make sure to select DVD Image (ISO) Installer.
Over in VirtualBox Manager, you want to select Machine > New from the menu dropdown. Name the machine and select the downloaded ISO. At this point the OS Type and Version may change to “Other” and “Other/Unknown”. Change Type to BSD and Version to FreeBSD (64-bit) and hit next. Give the guest at least 1GB memory, 2 CPUs and 16GB Virtual Size Storage before clicking next to get a summary page, and click Finish to complete this part.
Open the Settings for your pfSense guest in VirtualBox Manager and head to the Network tab. Adapter 1 should be NAT by default so let’s keep it that way. Click Adapter 2 and configure this as Internal Network (name it whatever you like such as malnet).
Start up the host and you’ll be greeted by a usage agreement screen. Click accept and continue through the install wizard, accepting the defaults as you go (when you hit a section to select a disk to partition (ZFS Configuration), hit space to select the disk). Once the install is complete, you will be asked to reboot (remove the ISO here or shutdown and remove if it is locked out).
Network Config
On first boot, you will be prompted for some responses:
- Setup VLANs: N
- Enter WAN Interface Name: Likely em0 as this is the first interface
- Enter LAN Interface Name: Internal/Host-Only interface (em1)
When the guest is ready, you should see details, options and a prompt like so:
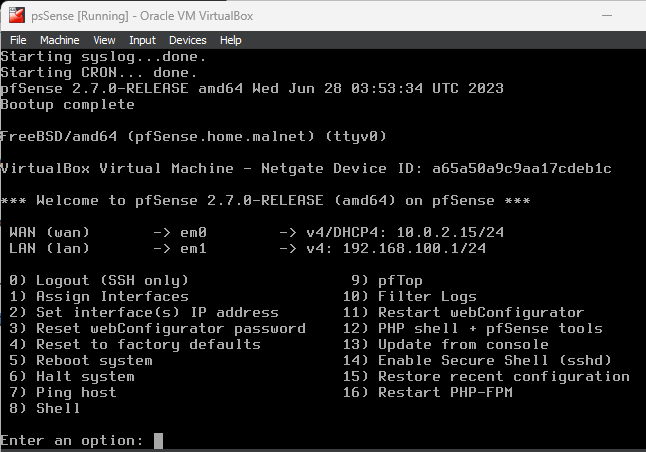
Feel free to update the LAN settings as you wish based on any specific lab configuration you may require
Web GUI Setup
We want our REMnux guest to use the newly configured firewall and network. To do so, edit the network settings for the REMnux guest so that the adapter is attached to Internal Network and ensure to use the same name you chose in the firewall setup i.e. malnet. if you boot the machine prior to doing the change, don’t worry as it can be done while the analysis guest is running.
Assuming all is well with the setup, fire up a web browser in REMnux and navigate to the LAN IP specified in the pfSense console. You should reach the logon screen like so:
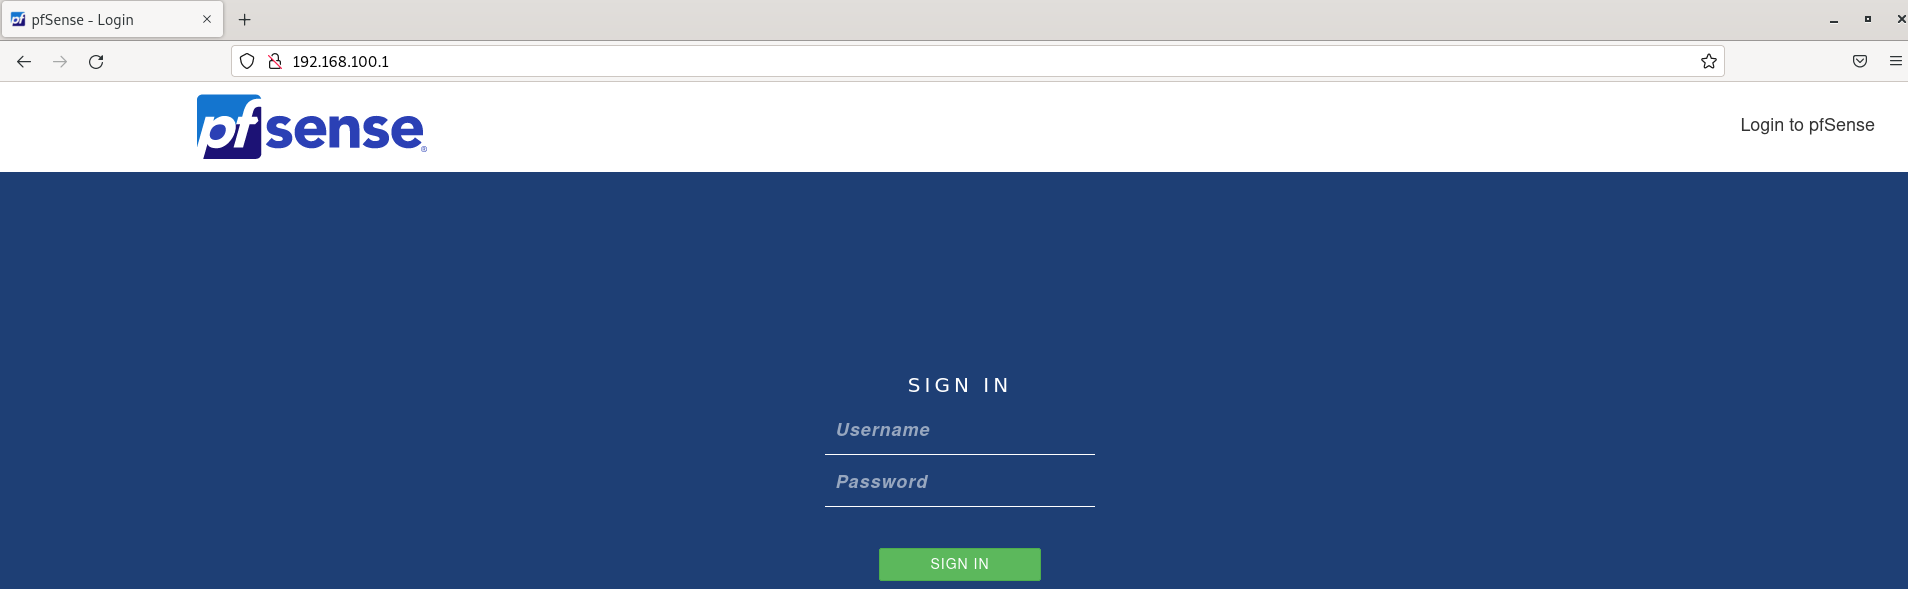
Default login is UN:admin / PW: pfsense which should lead you into a setup wizard. The defaults here are generally fine, though do change the admin password (good habits and all!).
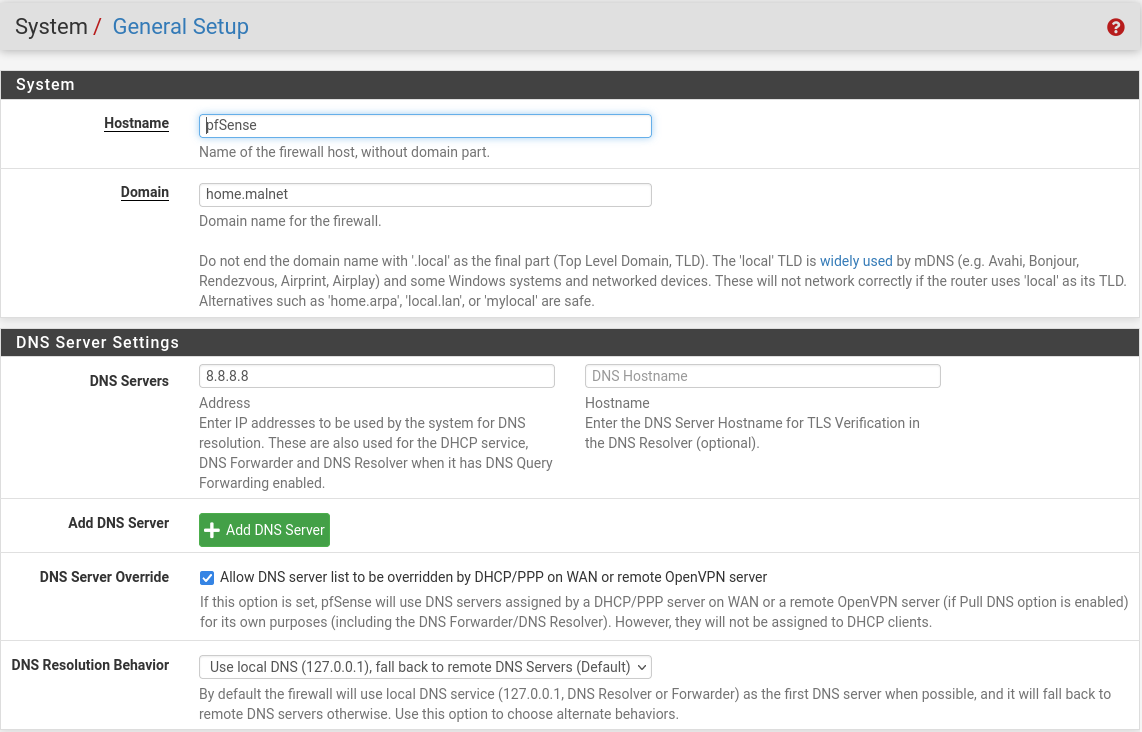
At this point, I was able to test connectivity between my REMnux guest and pfSense via ping, however, I noted no DNS resolution. By clicking System > General Setup from the top menu, you can find the section to update DNS Server Settings. Add whatever DNS resolver you like, in this case 8.8.8.8 works just fine for resolution purposes as demonstrated below:
Sudden DNS Issues with pfSense and VPN? (It Might Be Your Provider)*
Recently I noticed a change in behaviour within my lab in that when I was connected to VPN on my host, I would lose internet connectivity! After a bit of poking around, it seems my provider has made some upstream changes to their servers which was dropping all traffic coming from the pfSense guest. If this happens, the steps I took to resolve were:
- Add VPN provider DNS server(s) in settings as above
- Services > DNS Resolver > General Settings
- Enable Forwarding Mode (Save and Apply)
Finally, to ensure that your host network is actually isolated, click Firewall > Rules from the top menu bar, and you can edit the required interface rules. Within the LAN tab, add a new rule with the following values (edit Destination IP to whatever your physical network range is):
- Action: Block
- Interface: LAN
- Address Family: IPv4
- Protocol: Any
- Source: any
- Destination: Network / 192.168.0.0/24
- Description: Isolate Physical LAN
At this stage, we have configured an analysis machine and supporting firewall in order to get started with Linux malware analysis. Take note that this setup does allow the REMnux host to call out to the Internet to retrieve payloads or communicate. If you wish to run purely offline the easiest option is to disable the network adapter for the analysis guest machine. A good alternative is to configure the pfSense rules to log and filter traffic instead, so that you get a broader picture of what the malware is attempting to do.
There we have it, Part 1 of x (no idea yet on scope!). If you made it up to here, and found this information useful; please like/repost and feel free to give me a follow on my socials (links in the footer). Feedback is also welcome!
Up next, I’ll be discussing my “approach” and tooling that I utilise for static and dynamic analysis.
updated: 19/03/2024